Fat Quarter Gang – Wellen Tank by luvinthemommyhood

FatQuarterGANG_banner400pxBLUE
Wellen Lead
Hi everyone! I'm Shannon from luvinthemommyhood and I'm here to inspire you to take some fun quilting techniques & add them into your wee ones wardrobe this summer!

 Wellen Lead 2

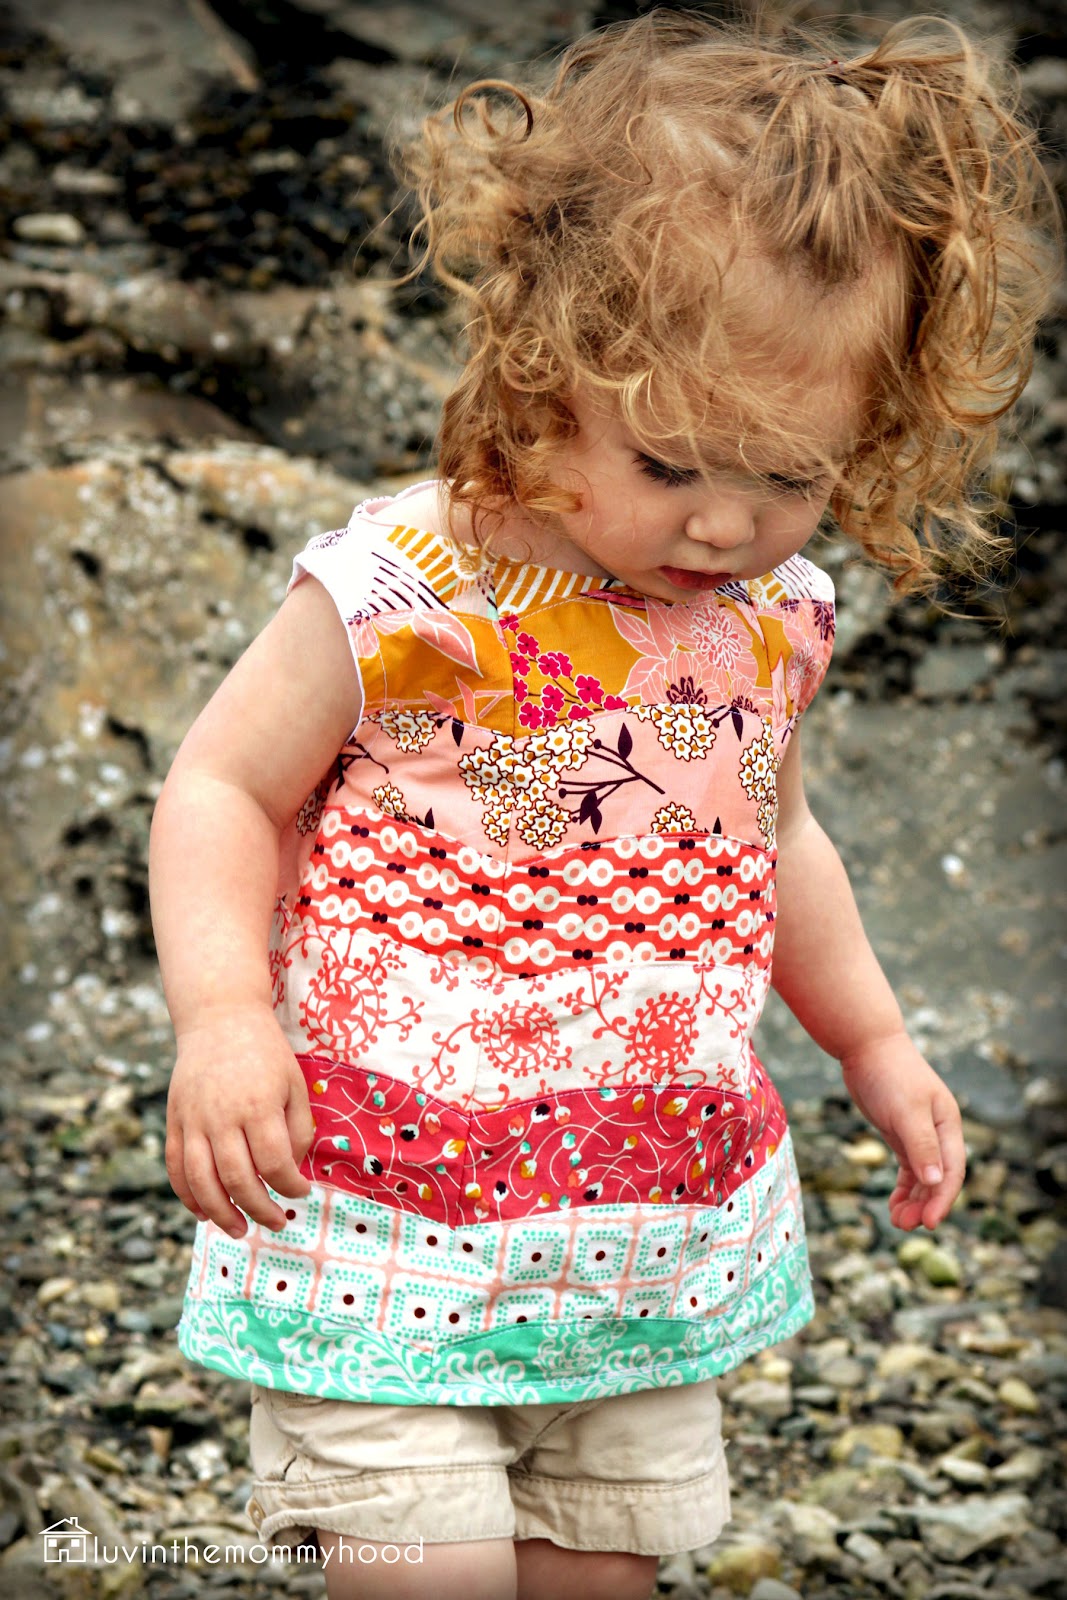
 This adorable tank was inspired by the beautiful coast I am so lucky to live on. The gorgeous waves never cease to take my breath away and I thought it would be fun to try to replicate the feeling of the waves with the equally gorgeous line "Summerlove" from Pat Bravo.  A perfect combination – yummy summer tones reminiscent of sand and surf partnered with the swoops and curves of coastal waves.

Wellen Lead 3

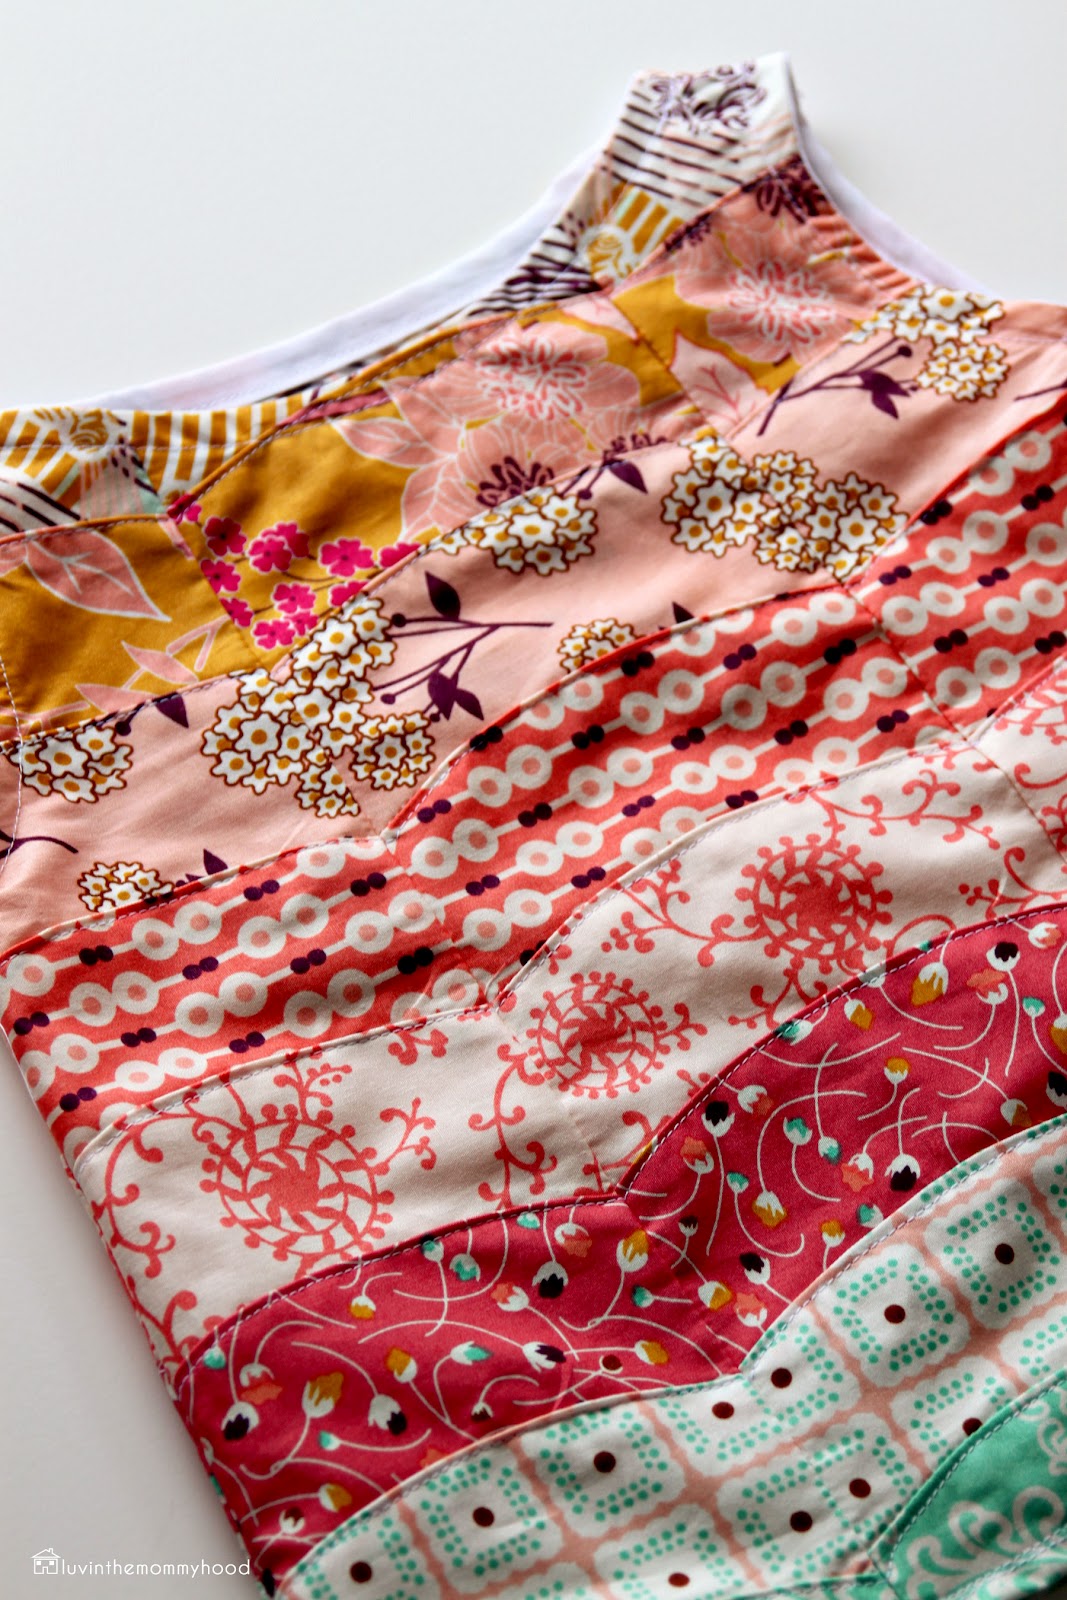
The tank itself is simple in construction with a wide neckline & strap and an a-line cut allowing all the detail work of the curves to speak for themselves and to allow that lovely fabric to shine!  It's a fun project and a great way to dive head first into sewing with curves. I'm now hopelessly addicted and dying to make a quilt to match!

Wellen Lead 4

So join me….take a walk along the surf, smell the ocean breeze, feel the sand between your toes and get inspired to add The Wellen Tank to your kidlets summer wardrobe!

Let's get started…

June-misc-107ab

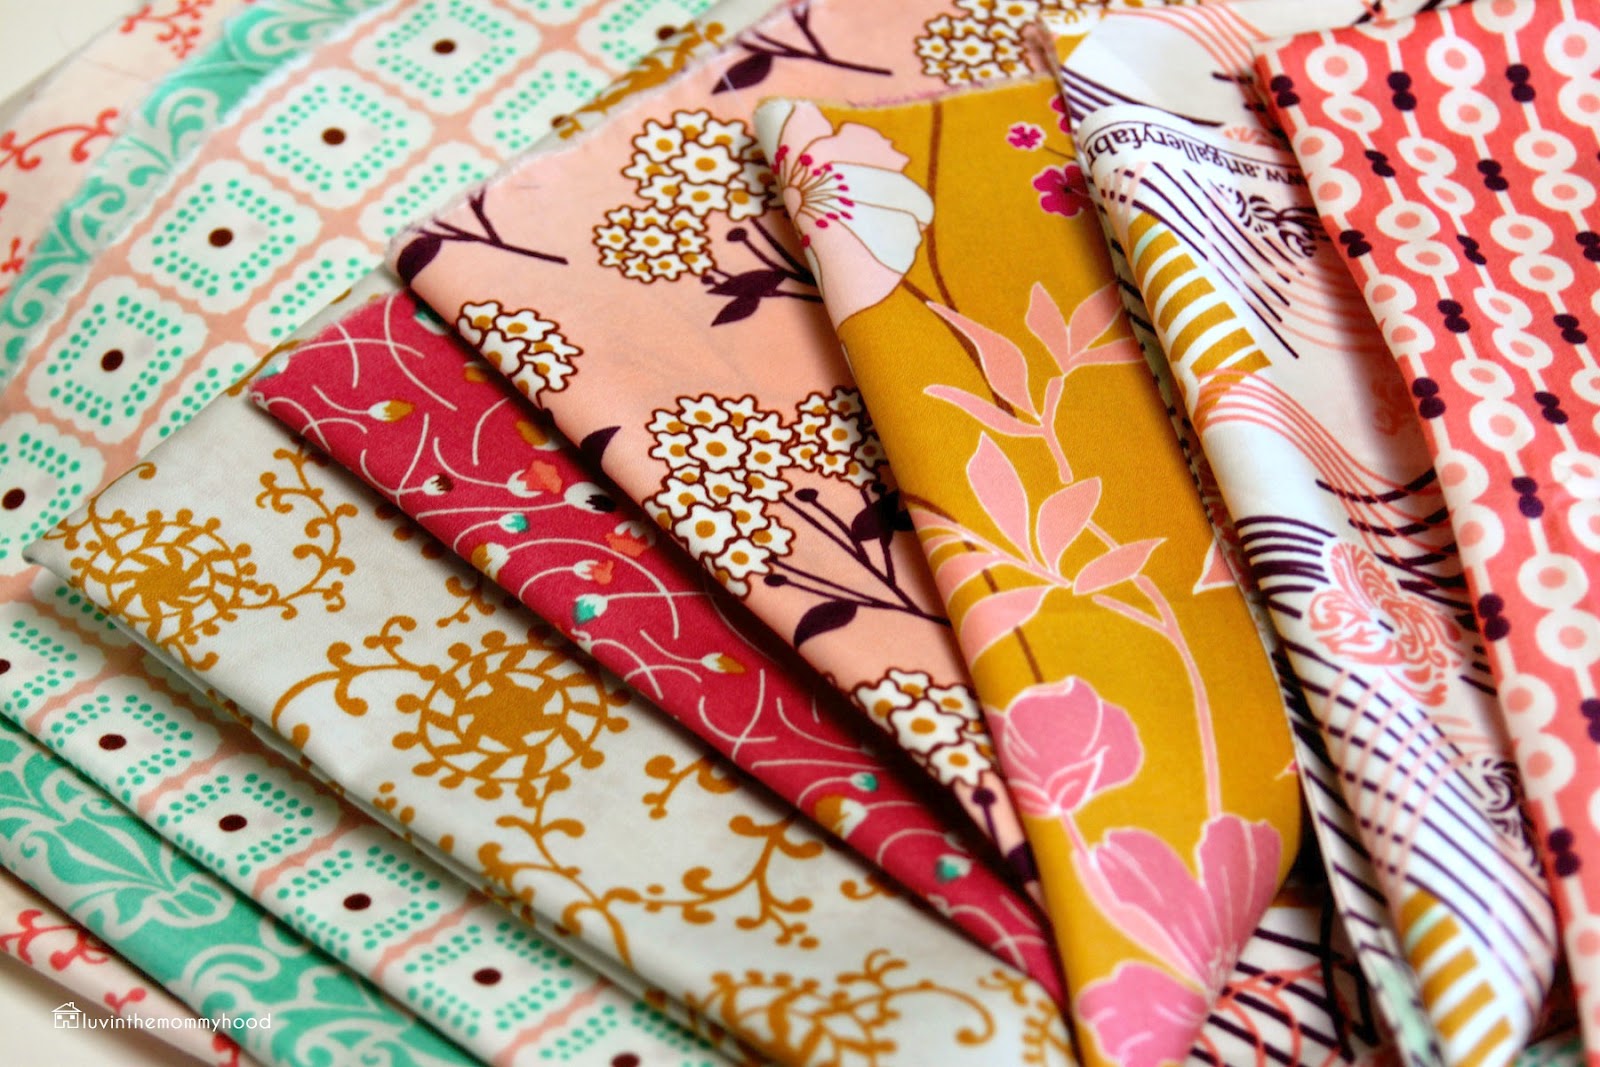
MATERIALS : – 8 Fat Quarters of Quilting cotton. I used Summerlove by Pat Bravo for Art Gallery Fabrics. Prints used were from "Sunkissed": Beyond Bliss Ginger, Swept Away Serenity, Tokens of Love Pink, Passionate Spirit Teal, Malibu Kiss, Naivety Berry, Sweet Days Seashell, Retro Harmony Sugar. – Approximately 44" of  handmade bias tapeor 1 package pre-made. – Co-ordinating thread – Pins – Scissors/rotary cutter & mat.

PATTERN PIECE : – Download and print the "curves template" here:

*Note: When printing please make sure your printer is set to "actual size" or set your page scaling to "none".  Be sure not to select "shrink to fit" or any other page scaling as this will result in your pattern pieces being the incorrect size. Pattern piece is sized to fit on a standard 8.5" x 11" page.

For the tank top pattern itself use a pre-existing garment to trace your pattern piece from.  There are a lot of great tutorials online that you can find that will show you how to use an existing piece of clothing to trace out a pattern template. Make sure when making a larger/smaller size than a 2T that you adjust the amount of  "curved" pieces needed. You can simply add another column of curves to increase the width and to increase the height you would add more curved pieces to the top of each column.  For more instructions on how to do this please see Step One below.  My tank top was a Size 2 Tank that I drafted from scratch.

*Note: The style of tank used to draft your pattern would need to  have a wide neckline to allow the tank to slip over the child's head without the use of buttons, zippers or a "v" neck.


INSTRUCTIONS :

*Copyright 2012. All rights reserved www.luvinthemommyhood.com  Personal use only unless prior permission has been given.

Wellen-059a

STEP ONE: PREP AND CUT YOUR FABRIC

*Note: Make sure to wash, dry and press your fabric before sewing.  This is very important when making garments.

– Print out your Curves Template Piece and cut (6) curves out of  all (8) of your prints for a total of (48) curved pieces.  I did this with my fabric folded so that I could cut doubles right off the bat.  Make sure that when you are cutting your curved pieces that your grain line (straight grain) is going vertically.  Your selvadges will be parallel to this.  When you tug the fabric you should feel some give/stretch from left to right.  If the give is from up/down you need to adjust your fabric.

June-misc-112ab

 
Starting from bottom going upwards – #1 – Passionate Spirit Teal, #2 – Sweet Days Seashell, #3 – Naivety Berry, #4 – Malibu Kiss, #5 – Retro Harmony Sugar, #6 – Tokens of Love Pink, #7 – Beyond Bliss Ginger, #8 – Swept Away Serenity

-  Lay your curved pieces out and plan your layout for your "waves".  We will be assembling these in the next step in columns so it's easiest to plan your layout laying them out vertically first and then if you'd like to see the whole picture align more columns of curves beside your original column.  I used the following layout shown in the picture above. – I'm all about customizing great garments for your own style/taste.  The outline of the Wellen Tank is easy and quick to change. Based on the tank you are using for your pattern you can lower the neck, add a v, widen the a-line or elongate the hem  – it's up to you! That's the fun part of making your own clothes!  If you would like a larger/smaller size just adjust the number of curves used to make each column and the amount of rows of columns you use.  We are essentially going to be creating two large rectangles made of pieced curves that are made big enough to cut your tank pattern out of.  Ready to get sewing? Yay!  

STEP TWO: SEWING YOUR CURVES

June-misc-136abc
– Lay your pieces out in order in separate piles for each soon to be sewn column.  Figure out what is your inner concave and what is your outer concave.  See the pic above for an example.
PicMonkey Collage– Take your first curved piece and lay it right side facing up with your inner concave to your right.  Place your next curved piece wrong side facing up with the inner concave to the left taking care to align only your top point at this moment as shown in the image below.

*Note: Your top will overlap just a bit with the point not matching up with your bottom curve. This is fine.

PicMonkey Collage4 (2)
– Now comes a bit of a tricky part.  It's going to feel weird to sew these two together but trust me – it will work out.  Use a 1/4" seam allowance using the outer edge of your presser foot as a guide to use as you move your curve while sewing.  I didn't use pins and you don't need to either.  Simply go slow while you get the hang of it.  I highly suggest doing a sample swatch to try it out before you do the real one.  Once you start sewing you simply slowly keep moving your top piece "only" to align it with your bottom one and voila! A sewn curve!  You don't even need to clip your seams!!!! That's right! Turn that bad boy right side out and press and you've started your column!  I pinked all of my seam allowances to prevent unraveling since this will be a worn garment.
PicMonkey Collage6
– Continue on joining curve to curve building your column in this manner always starting with your curved pieces laid out as previously stated.  Once you have sewn (8) curves together you have finished your first column!  Make 5 more columns in this manner for a total of (6) columns. – Once you are done all your columns and pressed them all neatly line up (3) columns for your front rectangle.  Pin (2) columns together with right sides facing each other.  Pin along the left outer long edge.  Sew these columns together using a 1/4" seam allowance.  Trim your seam allowance with your pinking shears and press neatly.  Now attach your other column to the right side of the column with right sides facing each other.  Repeat the steps above.  You now have your front rectangle complete.  Repeat the steps in this paragraph to make your back rectangle.
June-misc-118a
– We're going to topstitch those pretty waves you created now :)  With your front rectangle topstitch along all of your seams (right side facing up) to add some detail and also so that those curves look nice and finished. I've got a thing for topstitching so following the waves with some pretty stitching was a lot of fun for me :)  Press.  Repeat for the back rectangle. Great job!
June-misc-128a

STEP THREE: SEWING YOUR TANK

Wellen-045a
– Get out your tank pattern pieces and cut them out of your newly created wave rectangles.  Place your front pattern piece on your front rectangle piece and cut it out.  Do the same for the back pattern piece placing it on your back rectangle. – Take your front and back tank pieces and place them right sides facing each other. Pin your side seams and sew them with a 1/2" seam allowance.  Zig zag stitch/pink or serge your seam allowances to finish your seams.  Press. – Pin your shoulder seams.  Sew them both with a 1/2" seam allowance.  Finish your seams in the same method as your side seams. – If possible try the tank on your wee one before finishing in case you need to make any adjustments and also to mark your hem length.
Wetten-039ab
-  Press your bottom hem up 1/4" and press.  Press the hem up yet again 1/2" and pin in place.  Sew along the inside edge of your fold. I like to do two stitch lines on my hems for a nice professional finish.  I simply follow the first one and stitch about the size of the one of the teeth of the presser foot away from it.  It is also possible to sew the hem with just a double needle if you have the option on your sewing machine.  Press again.

STEP FOUR: FINISHING YOUR TANK

Wetten-011a
– We are now going to finish off your neckline and your armholes.  You can choose to either make your own bias tape or used pre-bought bias tape.  I used pre-bought single fold bias tape for my tank. Single fold bias tape is most commonly used for finishing garments when you don't want it to show.

Wellen-034a
– With your tank right sides facing out take the edge of your bias tape (wrong side facing up) and pin along your entire armhole.  Stitch down along the first crease of your bias tape.  Turn the tank inside out and fold the bias tape over and under pinning as you go.  You will not be able to see the bias tape from the outside now.  Stitch down close to your bias tape inner edge.  Repeat this for your other armhole and for your neckline.  Press.  Voila!  You now have your very own Wellen Tank (wellen is german for waves)!  You did awesome!  I can't wait to see it!

Wellen Lead 6 
Happy sewing from my home to yours :) 

You in the mood to win some fabric?  Let's hear from Art Gallery Fabrics below on how to enter to win your very own bundle of Summerlove!!!!

PicMonkey Collage4
Wellen Lead 5

Join the fun and sew along… join our Flickr group (it may or may not..but mostly may.. include random prizes).

Trying to keep up with all of AGF and what we have to offer..  well here are all the links to help you do just that :) Follow us on Twitter, Like us on Facebook, Pin us on Pinterest and check out our consumer website.

Now for the Giveaway Rules (dum dum dummm)

Forluvinthemommyhood:

Follow the instructions on luvinthemommyhood's blog.

For Art Gallery Fabrics

Follow us on Pinterest , Like us on Facebook, Subscribe to the blog and leave a comment letting us know you did. (wow!, we are a high maintenance bunch..lol. Honestly we want you all involved in all of AGF… you know we do cool things right!?)

Wellen-Lead-9a
(Picture that inspired the Wellen Tank)

Until next week, <3 The Fat Quarter Gang & AGF Team

102 responses to “Fat Quarter Gang – Wellen Tank by luvinthemommyhood”

  1. mandy Avatar

    OMG I love it!

    Like

  2. Rachel Booth Avatar

    Hey! I subscribed to Art Gallery Fabrics!
    Rachel
    http://www.rachelboothhappilyeverafter.blogspot.com

    Like

  3. Rachel Booth Avatar

    I follow Art Gallery Fabrics on Facebook

    Like

  4. Rachel Booth Avatar

    I follow Art Gallery Fabrics on Pinterest!
    Yall have some great pins!! :)

    Like

  5. Lynne Avatar
    Lynne

    Do you have a PDF of this project for download?

    Like

  6. Amanda Kaye Grant Avatar
    Amanda Kaye Grant

    I follow you on Pinterest as Amanda Grant
    Thank you!
    Amanda Kaye Grant
    robertkaye at charter dot net

    Like

  7. Amanda Kaye Grant Avatar
    Amanda Kaye Grant

    I am a new fan on your Facebook page <3
    Thank you!
    Amanda Kaye Grant
    robertkaye at charter dot net

    Like

  8. Amanda Kaye Grant Avatar
    Amanda Kaye Grant

    I am subscribed to your blog through my email =)
    Thank you!
    Amanda Kaye Grant
    robertkaye at charter dot net

    Like

  9. Kristin Orth Avatar
    Kristin Orth

    I have done those three things! Thanks for a chance to win!

    Like

  10. Phoebe Thomas Avatar
    Phoebe Thomas

    Hi! Thanks for the giveaway. I followed you on Pinterest.

    Like

  11. Phoebe Thomas Avatar
    Phoebe Thomas

    I am a new fan of yours on Facebook.

    Like

  12. bezaz Avatar
    bezaz

    amazing colours!! I love this collection :)
    I’m AGF follower on FB and Pinterest :D

    Like

  13. Nurseli Avatar
    Nurseli

    I already stalk AGF on Facebook and the blog. Heading over to pinterest now to follow you there too. Too bad I don’t have any little girls. Too cute!

    Like

  14. Carrie O'Rourke Avatar

    Love the dress. The model is quite a doll herself.

    Like

  15. Jill Avatar
    Jill

    thanks for another chance to score some gorgeous fabrics! I’m following you, I like you, and I’m subscribed.

    Like

  16. Kristy Avatar

    Beautiful and clever design! Thanks for all the great inspiration!
    I’m following on Pinterest. facebook and subscribed to the blog! :) Thanks for the giveaway too!

    Like

  17. Emily Avatar

    this is so cute – I’m pretty sure I could use my new quick curve ruler to cut those too! :)

    Like

  18. amorette Avatar
    amorette

    i follow art gallery in all these places- i need to get my butt in gear and get something in the flickr group!

    Like

  19. JulieL Avatar
    JulieL

    I followed you on Pinterest, and I liked you on facebook.
    What a cute pattern, and beautiful fabrics.
    Julie

    Like

  20. VickiT Avatar
    VickiT

    Oh my gosh! I am in love with not only that adorable little shirt but that totally adorable child with all that gorgeous red, curly hair. What a cutie!
    And the fabrics used are just perfect. I must make one as soon as I figure out if I can get my hands on clothing to make a pattern for both my Granddaughters. What a great little summer top. Thank you so much.
    I have also signed up to follow Art Gallery Fabrics via email subscription.

    Like

  21. Melissa Avatar

    Yay! I do all three of those things already.

    Like

  22. Jennie Bobbins Avatar
    Jennie Bobbins

    I Follow on Pinterest!

    Like

  23. Jennie Bobbins Avatar
    Jennie Bobbins

    I Like AGF on Facebook!

    Like

  24. Jennie Bobbins Avatar
    Jennie Bobbins

    I Subscribe to the blog!

    Like

  25. Becky Greene Avatar
    Becky Greene

    Lovely pictures – I already follow AGF in all the ways that you mentioned. Thanks for the chance to win!

    Like

  26. Meagen Avatar
    Meagen

    Love it! I already subscribed to AGF a while back. Thanks.

    Like

  27. Meagen Avatar
    Meagen

    Liked you on Facebook!

    Like

  28. Dawn Avatar
    Dawn

    I subscribe to AGF blog.

    Like

  29. Deidra Avatar
    Deidra

    Following on FB

    Like

  30. Deidra Avatar
    Deidra

    Subcribed to your blog

    Like

  31. Lindsay Avatar
    Lindsay

    I subscribe to the blog and Pinterest, but I don’t have Facebook, so I don’t follow you there. Thanks for this great tutorial, this tank is adorable!

    Like

  32. cynthia Avatar
    cynthia

    What a charming tank! Thanks so much! I subscribe and I liked on facebook.

    Like

  33. Julie Avatar
    Julie

    Love the wellen tank!

    Like

  34. Ramona Avatar

    Following you on Pinterest

    Like

  35. Ramona Avatar

    Following you on Pinterest

    Like

  36. Ramona Avatar

    Ugh! above is a duplicate. I follow you on Facebook

    Like

  37. Ramona Avatar

    I follow your blog. Beautiful fabrics!

    Like

  38. Denise Avatar
    Denise

    I do Follow you on Pinterest , I do Like you on Facebook and I do Subscribe to the blog. Thanks for the inspiration.

    Like

  39. Chelsea Avatar

    Cute pattern. I’ve done all 3.

    Like

  40. Anita Avatar
    Anita

    Thanks for the great tutorial! I follow AGF’s blog :)

    Like

  41. Adele Avatar
    Adele

    Cute,cute,cute! I subscribe.

    Like

  42. Judith Avatar
    Judith

    That is such a cute top. I ‘like’ you on FB

    Like

  43. Rebecca T Avatar
    Rebecca T

    I follow you on pinterest! Reb thack

    Like

  44. Rebecca T Avatar
    Rebecca T

    I follow you on FB

    Like

  45. Rebecca T Avatar
    Rebecca T

    I follow your blog via google :-)

    Like

  46. Kasia Avatar
    Kasia

    I have been a follower of your blog via google reader !

    Like

  47. Kasia Avatar
    Kasia

    Liked you and commented on your FB too

    Like

  48. rachael Avatar

    subscribe to the blog (of course!) love this project :)

    Like

  49. anais Avatar
    anais

    We will be making this one into a pdf soon :)

    Like

  50. Jacklynn Grimm Avatar
    Jacklynn Grimm

    I follow AGF on Facebook.

    Like

Leave a reply to Rachel Booth Cancel reply

We’re AGF

At Art Gallery Fabrics®, we aspire for the best, from creation to delivery with reliable quality, and top customer service. We believe strongly in the quality of the fabric that is transcended in our superior thread count and fine weave, our mills uphold sustainable printing methods and are OEKO-TEX certified 

Latest Lookbook

Let’s connect