Hello my creative friends!!
As one famous designer once said “…. I went to fashion school for four years and then work for a very long time just to realize that all women want is pockets!" Now, don’t ask me who the designer was, but for sure she or he was completely right!

We always have pretty things, secret things, necessary things, and even forgotten things that we need to carry with us … so while designing the Puri Tote for the beautiful Flower Child collection I thought it would be a great idea to add a welt zipper pocket and take pictures of the process to share with you my experience and also my mistakes ;)
The featured fabrics are Cosmic Sister Imprint (Fabric A) and Braided Path Sublime (Fabric B)
I used one (1) 11” x 14” quilted rectangle from fabric A, one (1) 10” x 22” rectangle from fabric A, one (1) 10” x 22” rectangle from fusible interfacing, one (1) 10” x 14” rectangle from fabric B, and a 8” zipper (in which the zipper teeth measure 7 ½”)

Start by trimming your 11” x 14” quilted rectangle to 10” x 13” and by fusing the 10” x 22” fusible interfacing to the wrong side of the 10” x 22” rectangle from fabric A.
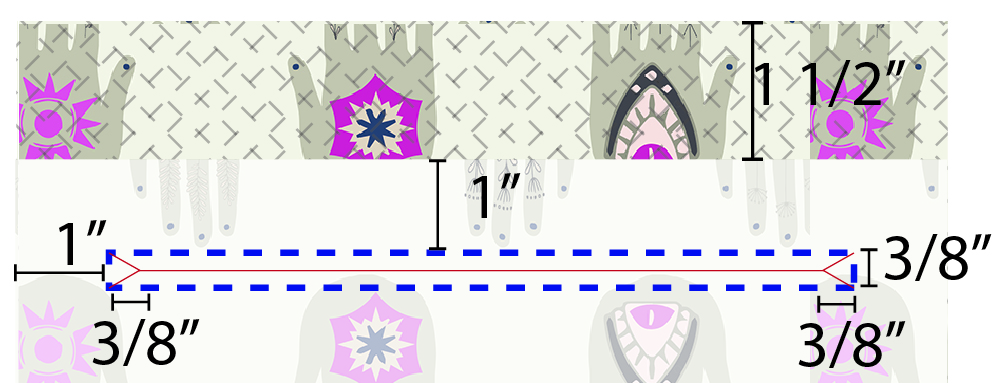
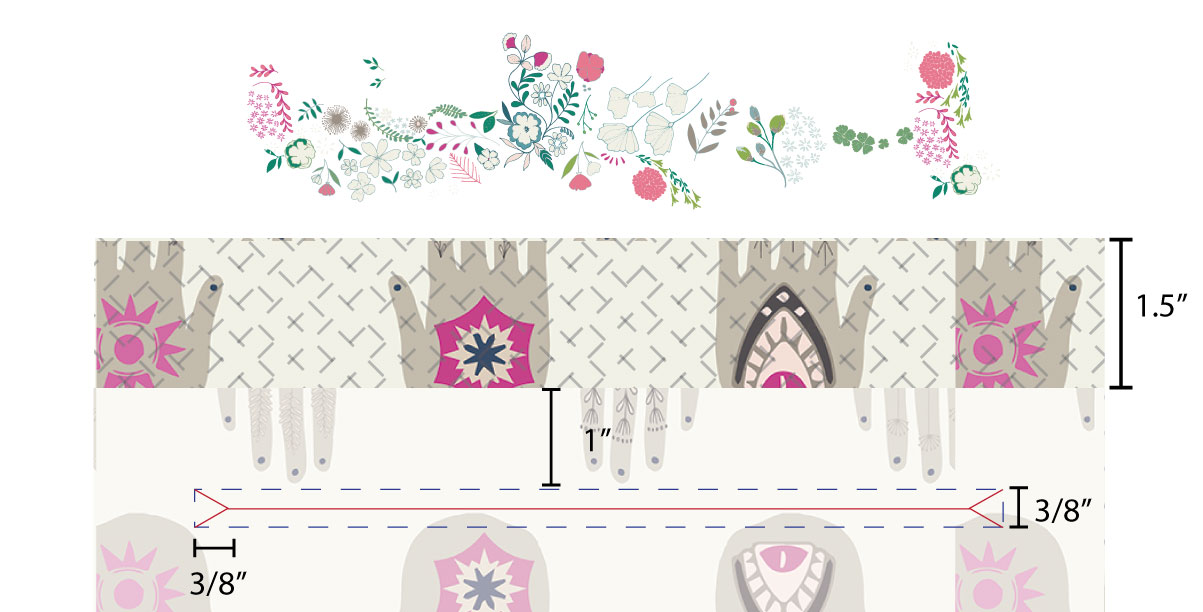
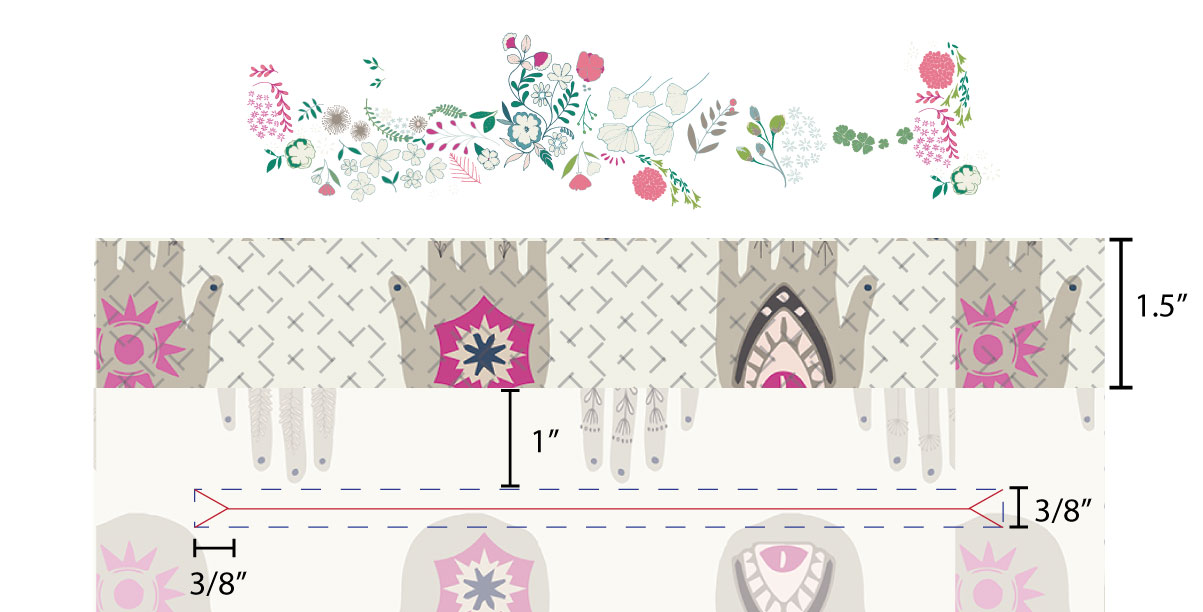
On the fused side of the 10” x 22” rectangle draw one (1) 8” x 3/8” rectangle 1” below the top edge. By mistake I drew my rectangle twice as high, so it ended up measuring 8” x ¾”, however at the end my pocket still looked great!
Draw a horizontal line in the center of the rectangle, mark a point 3/8” from the side edges of the rectangle on the center line, and draw diagonal lines from the marked point of the corners of the rectangle.

Place the fused fabric face to face to the quilted rectangle 1 ½” below the top edge.

Stitch both pieces together following the rectangle line.

Follow this diagram to see all the measurements all at once:

Carefully use your scissors cut along the center line of the rectangle and the diagonal lines following the picture. As a result you will have four ears.

Take the top part of the fused rectangle and lower it the towards the upper horizontal ear and edge-stitch them together making sure you start and stop 1/8” away from the corners of the rectangles.

Repeat the same process for the bottom part of the fused rectangle. This stitches will help hold the ears and the fused piece in place once they turned to the other side.

Insert the fused piece through the opening so now the right side of the quilting rectangle is facing you.
Take the zipper and saw a stitch at the ends to hold the zipper tapes together in place.
Pin the zipper behind the opening, making sure it is centered, and stitch at 1/8” around the rectangle.

This step was a little challenging for me because instead of making the rectangle 3/8” high, I made it ¾” high, so my opening was bigger and I had less overlapping space between the zipper and the pocket to saw them together. However I did it, and I loved how it came out.

Once finished I realized that the print of the fused fabric is upside down. Fortunately for this purpose I like how the hands are facing down inside the pocket, however if the print of your pocket is directional and you want it to look right side up, then make sure you draw the rectangle on the other side of the fused fabric.

Finally use the 10” x 13” rectangle from fabric B to place in the back of the pocket so it looks clean on both sides, and use it for any project you have in mind.

Do you think this technique could be used in clothing too? What other projects would you add the welt zipper pocket to?
Happy pocketing :)
Laucara


Leave a reply to Kate Cancel reply