Dresden Mandala Tutorial

Hello my fellow makers,

How about a beautiful, mandala for someone you love? The mandala is a symbol of cosmic and spiritual order, composed by balancing elements that represent unity and harmony. We will be making a mandala full of vibrant colors, fun geometric elements, and feminine lines using the exquisite prints from the  Legendary collection and the dresden technique. A technique that just like the mandala has a concentric and circular shape.

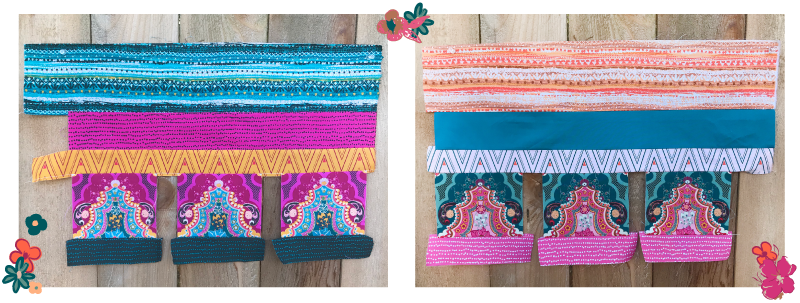
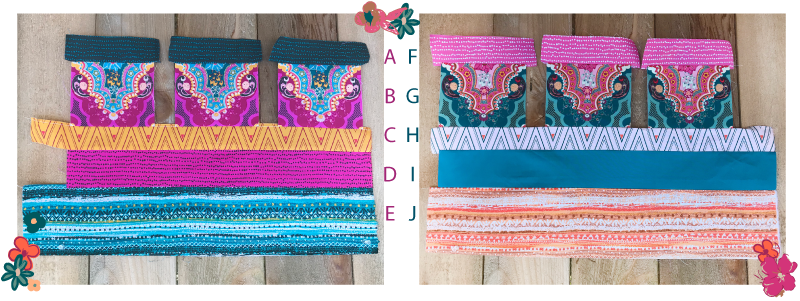
The featured fabrics are Flecks Dreams (fabric A), Brit Boutique Bold (fabric B), Collar Ends Bold (fabric C), Flecks Bold (fabric D), Trinkets Dreams (fabric E), Flecks Soul (fabric F), Brit Boutique Boho (fabric G), Collar Ends Soul (fabric H), Tile Blue (fabric I), Trinkets Soul (fabric J), Femme Metale Boho (fabric K), and Coffee Bean (fabric L).

Typepad-Images12

Start by designing two strip sets in the same size with contrasting colors. In this case, I cut rectangles from fabrics AB and FG to center their print with the small triangles from fabrics C and H. Just to get a more balanced effect once all the pieces are joined … and also because I'm a fanatic of print alignment :). 


Typepad-Images09

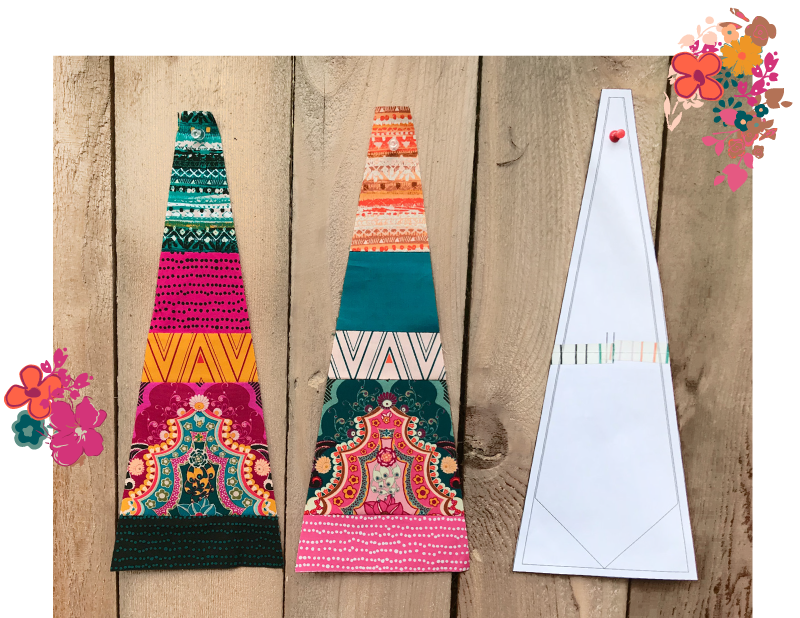
Use the template from the Cosmos Mandala wall art to cut your pieces. If you would like to make a bigger dresden, all you have to do is make the template bigger by following the side lines. 

Typepad-Images01

Take each piece, fold it in half lengthwise with the wrong side out, stitch at 1/4" from the top edge, and turn it to the right side.

Typepad-Images11

Press open the seam and align it to the center back of each piece. The top part will get a triangular shape.

Typepad-Images03

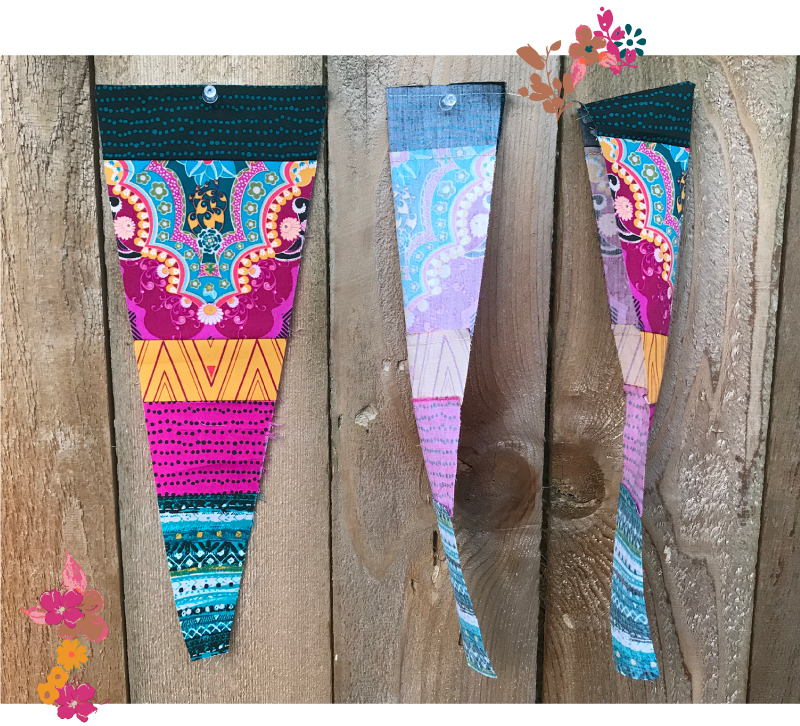
Join each piece from colorway 1 to one piece from colorway 2. The amazing part of this step is that the outer side of the dresden already has a clean edge!Typepad-Images10

The dresden is composed of twenty (20) pieces.

To make sure after joining all the pieces your dresden lays flat, make two (2) sets of ten (10) pieces each, or two (2) semicircles, and then join them.


Typepad-Images05

Two options to make the center of the dresden:

  1. Cut two circles in the same size, join them face to face, leaving a small space to turn them to the right side and press. In the following image I made two different circles, one in fabric K and a bigger one in fabric L. Then placed the circle from fabric L under the circle from  fabric K to give it an outlined effect.
  2. Make a circle and clean the edge of the circle with a bias binding tape. This technique you can see it in the Cosmos Mandala wall art, where I made a circle from fabric K, and cleaned its edge with a bias binding tape from fabric A.

Finally, place your dresden on top of a layer of fabric, batting and backing and secure it by edge-stitching 1/4" away from the outer edge of the dresden and 1/4" away from the border of the center circle.
Typepad-Images06

I hope you enjoyed this tutorial, and that you take the extra step to make it in different sizes for pillows, quilts, wall arts, or even for an amazing tote bag.

Happy mandala making!

Laucara

25 responses to “Dresden Mandala Tutorial”

  1. Rosemary B Avatar
    Rosemary B

    This is beautiful
    I would love to try it
    Thank you for the tutorial

    Like

  2. Laura Avatar

    Thank you Rosemary!
    If you do it please tag us, I would love to see it <3

    Like

  3. Linda Avatar
    Linda

    Can’t wait to pull out my Paula Nadelstern fabrics. Thanks for this beauty

    Like

  4. Laura Avatar

    Thank you Linda! I am so happy you liked it. I also love mandalas and circular designs <3

    Like

  5. Toni Getz Avatar
    Toni Getz

    This is beautiful. Thanks for the pattern.

    Like

  6. LTL Avatar
    LTL

    Who knew something so beautiful could be so easy!!!! Thank you I’m so excited to have a new way to use my Dresden ruler!

    Like

  7. Carol Kuse Avatar
    Carol Kuse

    Thank you for the tutorial. This looks fascinating. I can hardly try to use it.

    Like

  8. Angie in SoCal Avatar

    Beautiful! Thanks for the tutorial.

    Like

  9. Laura Avatar

    Thank you so much Toni!

    Like

  10. Laura Avatar

    I feel the same way LTL, I love the dresden, but I feel the colors and prints of the collection are the ones that made it so much more beautiful and bold.

    Like

  11. Laura Avatar

    Hi Carol, if you do, please tag us, I would love to see it :)

    Like

  12. Laura Avatar

    Thank you Angie, I am glad you liked it <3

    Like

  13. Aminah Lucio Avatar
    Aminah Lucio

    Hi,
    What was the size of your mandala?

    Like

  14. Laura Avatar

    Hi Aminah,
    from point to point, it measures 32″

    Like

  15. Ruth van Kalmthout Avatar
    Ruth van Kalmthout

    What a lovely Mandala Laucara.
    Never thought it would be possible to make such beautiful quilt but now I do.
    Thank you so much for this clear description.
    Very inspiring!

    Like

  16. Laucara Avatar

    Hi Ruth! thank you for your kind words.

    Like

  17. Laura Forgie Avatar
    Laura Forgie

    Could you show a picture of the back, please?
    I can’t figure out how you have finished the edges of the backing….. If you just edge stitch the mandala on top of the fabric, batting and backing…there will be raw edges on the back, won’t there?

    Like

  18. Laura Forgie Avatar
    Laura Forgie

    Never mind….I see the completed project on the artgalleryfabrics site.
    I get it now!
    ;-)
    Cheers

    Like

  19. Carol Ferensak Avatar
    Carol Ferensak

    I really want to make one of these, but it says “Use the template from the Cosmos Mandala wall art to cut your pieces” but I can’t find the template anywhere. Am I doing something wrong?

    Like

  20. Gail Avatar
    Gail

    Click on the link in red above (below the second pic) “Cosmos Mandala” and it is at the bottom of the pattern.

    Like

  21. Althea Seepaul Avatar
    Althea Seepaul

    This is beautiful, will ttry it

    Like

  22. Pat Bravo Avatar

    Hi Carol! Here’s the link, the template is on the last pages: https://liveartgalleryfabrics.com/wp-content/uploads/2022/08/Cosmos-Instructions-2022.pdf
    Hope that helps!

    Like

  23. BFromM Avatar
    BFromM

    I tried the link, but it doesn’t resolve to anything.

    Like

  24. Jodi Sedach Avatar
    Jodi Sedach

    Can you explain the center part again please? “Make a circle and clean the edge of the circle with a bias binding tape.” Not sure what that means. Make a circle from what and what does it mean to clean the edge of the circle with bias binding tape?

    Like

  25. Pat Bravo Avatar

    Hi Jodi, thanks for your interest! To clarify, this blog post references a pdf with more detailed instructions, in which you can find a 6″ circle template. The bias tape is made out of 1-1/2″ strips cut at 45 degree angle, this type of tape allows you to use the stretch of the strip to sew around the circle as if you were sewing a binding around the circle to cover the raw edges. I hope this helps! Here is the link to the pdf: https://liveartgalleryfabrics.com/wp-content/uploads/2022/08/Cosmos-Instructions-2022.pdf

    Like

Leave a reply to Carol Kuse Cancel reply

We’re AGF

At Art Gallery Fabrics®, we aspire for the best, from creation to delivery with reliable quality, and top customer service. We believe strongly in the quality of the fabric that is transcended in our superior thread count and fine weave, our mills uphold sustainable printing methods and are OEKO-TEX certified 

Latest Lookbook

Let’s connect