
Welcome back, fabric friends!
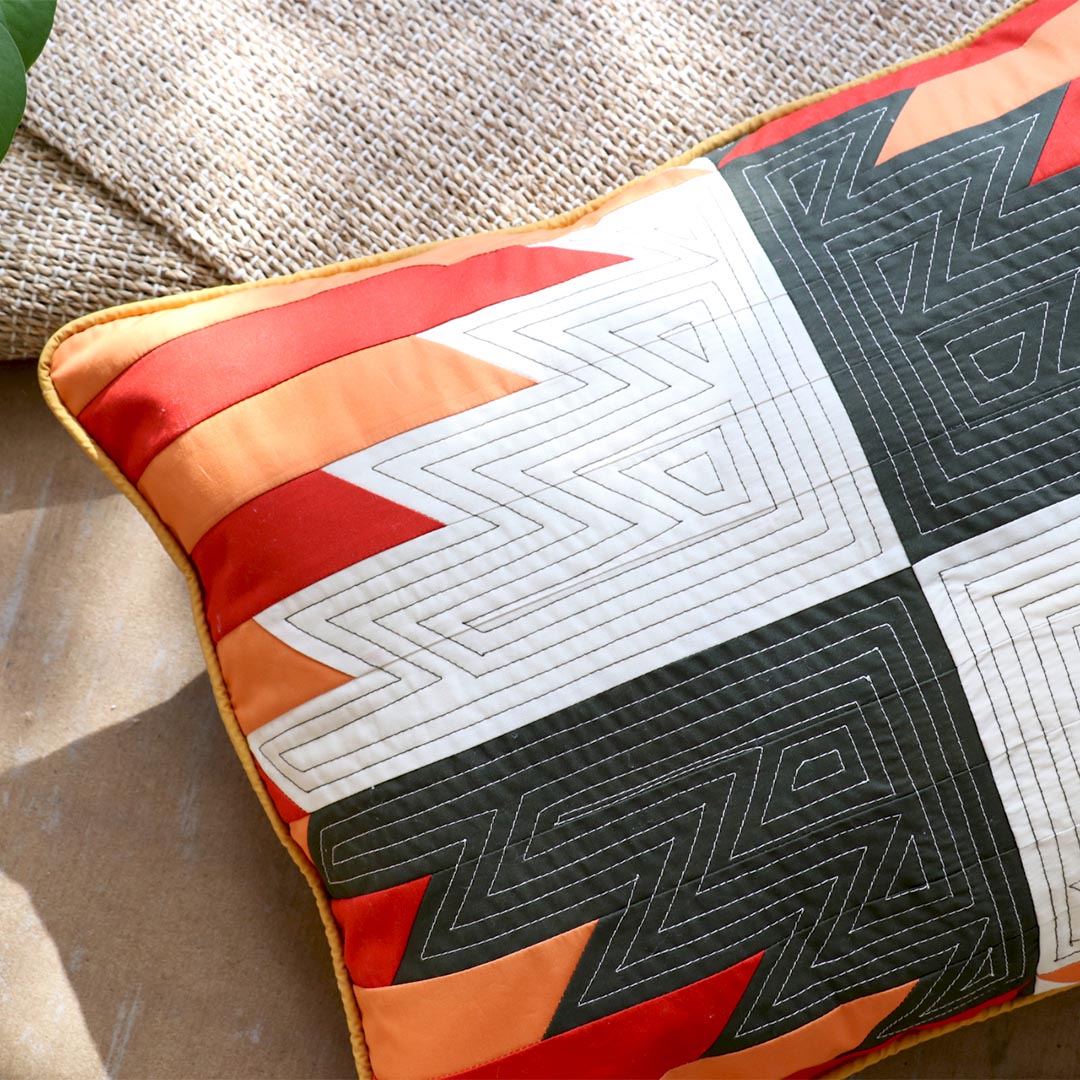
Today we are featuring one of my favorite and easiest way to create a patchwork pillow, I like to call this one "Zanthia" and if you know about basic half-square triangles, then you'll especially love making this pillow. Once you create the HSTs, all it takes is some cutting and rearranging to complete this look!
Have fun with your fabric choices too, as for this tutorial I kept it simple by using AGF Pure Solids, but play around with some movement by including some prints.
Let's get started!
FABRIC REQUIREMENTS:
Fabric A PE-421 1 yd
Fabric B PE-436 1/2 yd
Fabric C PE-456 1/2 yd
Fabric D PE-457 1/2 yd
Fabric E PE-482 1/2 yd
EXTRA MATERIALS:
- Batting
- Cotton Rope-90” for piping
- Backing:
- Two (2) 24” squares
- Pillow fill
CUTTING INSTRUCTIONS:
Three (3) 2” x WOF strips from fabric A.
Two (2) 22” x 15 3/4” rectangles from fabric A.
Two (2) 12 7/8” squares from fabric B.
Two (2) 12 7/8” squares from fabric C.
Two (2) 12 7/8” squares from fabric D.
Two (2) 12 7/8” squares from fabric E.
INSTRUCTIONS
To complete this pillow you’ll need to make two different blocks, for each block you’ll need two different HST combinations.
Begin with block #1.
For the first HST combination, take one (1) 12 7/8” square from fabric C and one (1) 12 7/8” square from fabric E.

Place one on top of the other, right sides of the fabric together, align.
Use a fabric marker and your ruler to trace a diagonal line from the top left corner to the right bottom corner.
Sew 1/4” away from each side of the previous traced line.

Use your rotary cutter to cut on top of the drawn line.
Press open, you should end up with two (2) CE HST’s.
Set aside.

Repeat the previous steps this time with one (1) 12 7/8” square from fabric D and one (1) 12 7/8” square from fabric E.
You should end up with two (2) DE HST’s.
 Sub-cut the HST’s into six (6) 2” strips as shown in the diagram below.

Sew the strips together alternating the colors following the diagram below for strip placement.
Make a total of two (2) block #1.
Press and set aside.

Take one (1) 12 7/8” square from fabric B and one (1) 12 7/8” square from fabric D.

Place one on top of the other, right sides of the fabric together, align.
Use a fabric marker and your ruler to trace a diagonal line from the top right corner to the left bottom corner.
Sew 1/4” away from each side of the previous traced line.
 Use your rotary cutter to cut on top of the drawn line.
Press open, you should end up with two (2) DB HST’s.
Set aside.

Repeat the previous steps this time with one (1) 12 7/8” square from fabric C and one (1) 12 7/8” square from fabric B.
You should end up with two (2) CB HST’s.

Sub-cut the HST’s into six (6) 2” strips as shown in the diagram below.
 Sew the strips together alternating the colors following the diagram below for strip placement.
Make a total of two (2) block #2.
Press and set aside.
Bring one (1) block #1 and one (1) block #2.
Sew them together and repeat the same steps one more time to end up with two rows.
 Attach the rows together as shown in the diagram below.

Quilt as desired.
I suggest and echo quilting with contrasting thread but feel free to get creative!
 Add piping if desired.

PILLOW BACKING
Take both 22” x 15 3/4” rectangles from fabric A.
Fold one 15 3/4” edge 1/2” towards the wrong side of the fabric of each rectangle.
Fold the same edge ó” again and edgestitch the fold in place to have a clean edge.
Take the quilted pillow top and lay it at the right side up.
Take one rectangle from fabric A and align it wrong side up to the right side of the pillow top.
Take the other rectangle from fabric A and align it wrong side up to the left side of the pillow top.
Pin the three pieces in place and sew around the edges at 1/4”.
Clip the corners and flip the piece to the right side of the fabric.
Fill the pillow.


and you're finished! I hope you enjoyed what I did with the quilting, I felt like I had to do something unique for this project. It'll be a cool idea too if you quilted on the red and orange pieces.
If you found this tutorial helpful or have any questions, please let me know in the comments below! As always, if you end up making this project, tag us on social media using the hashtag #artgalleryfabrics, I would love to see your creations.
Until next time,
Happy sewing!
-Jannelle


Leave a comment